
Service Request Search
This page Shows List of Pending Jobs depending on different search criteria
selected by user such as Branch, State, City, Customer
Principal,
Service Type, Date Wise, Advance Search Wise (SRQ Type, SRQ Status, Model
Number, Serial Number, Symptoms Wise.
You can go to Service Request Search Screen in following way:
1- Go to Homepage and click on Service Request Button located at the top of the page.
>>Want to Create New Pre-Installation Visit?
1- Click on the New>> Per-Installation Visit link that is seen at the right corner of the page, open the New Service Request screen.
>>Want to Create New Installation Notification?
1- Click on the New>> Installation Notification link that is seen at the right corner of the page, open the New Service Request screen.
>>Want to Create New AMC Proposal?
1- Click on the New>> AMC Proposal link that is seen at the left corner of the page, open the New Service Request screen.
>>Want to Search record of Particular Service Request?
Suppose you want the details of a Customer e.g. Reliance. Here are the steps to follow:
1- Particular Pending Job can be searched by Selecting Branch, State, City, Customer, Principal, Service Type.
2- To display the Particular Pending Job date wise, check the ![]() Date wise Search & Select From Date & To Date.
Date wise Search & Select From Date & To Date.
3- Tick on ![]() Advance Search & Select the SRQ Type, SRQ Status & Enter the Model Number, Serial Number,
Symptoms.
Advance Search & Select the SRQ Type, SRQ Status & Enter the Model Number, Serial Number,
Symptoms.
4- Click on Search Results >>> link.
5- The Service Request brief information appears in grid.
>>Want to Modify Service Request Information?
Suppose you have entered the Wrong Service
Request Information e.g. Reliance Customer by
mistake. Don't worry, here's the solution.
Just follow below steps:
2- In the grid below, you will find the Reliance Customer. Just click on
the ![]() (Edit)
button besides it.
(Edit)
button besides it.
3- You will see the Reliance Customer details of Service Request.
4- Change the Reliance Customer Service Request information and click on Save Service Request Information
>>Want to Add Dispatch Information?
Suppose you want to Add the Dispatch Information of Reliance Customer.
1- First Select the ![]() Dispatch Option.
Dispatch Option.
2- In the grid below, you will find the Reliance Customer. Just click on
the ![]() (Edit)
button besides it,
(Edit)
button besides it,
Open the Dispatch Master screen.
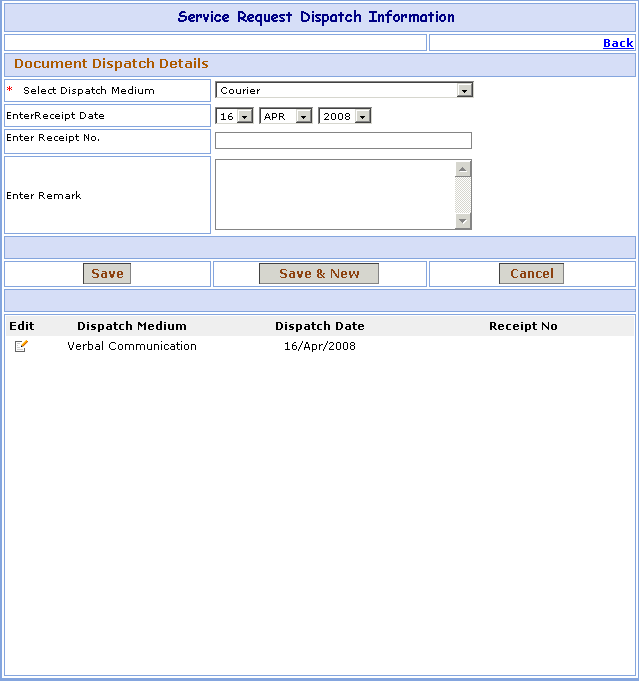
>>Dispatch Information:
1- Select Dispatch Medium. ex- Courier.
2- Select Receipt Date (DD, MM, YYYY).
3- Enter the Receipt No. & Remark.
Field marked with * are compulsory.
>>Want to save Dispatch Information?
Follow the steps given below:
2- Click on Save button to save Dispatch Information. OR
Click on Save & New button to save the Dispatch Information and clear all the fields to enter New Dispatch Information.3- Click on Cancel button to cancel the Dispatch Information and clear all the fields to enter New Dispatch Information.
4- Click on Back link, go to the Principal Search Screen.
>>Want to Modify Service Request Dispatch Information?
Suppose you have entered the Wrong Service
Request Dispatch Information e.g. Dispatch Medium (Courier)
by
mistake. Don't worry, here's the solution.
Just follow below steps:
2- You will see the details of Dispatch Medium (Courier).
3- Change the Dispatch information and click on Save button. ORClick on Save & New button to save the Dispatch Information and clear all the fields to enter New Dispatch Information.
4- Click on Cancel button to cancel the Dispatch Information and clear all the fields to enter New Dispatch Information.
5- Click on Back link, go to the Service Request Search Screen.
>>Want to Add or Modify Customer Approval Information?
Suppose you want to Add or Modify the Customer Approval Information of Reliance Customer.
1- First Select the ![]() Customer Approval Option.
Customer Approval Option.
2- In the grid below, you will find the Reliance Customer. Just click on
the ![]() (Edit)
button besides it,
(Edit)
button besides it,
Open the
Customer Approval Master screen.
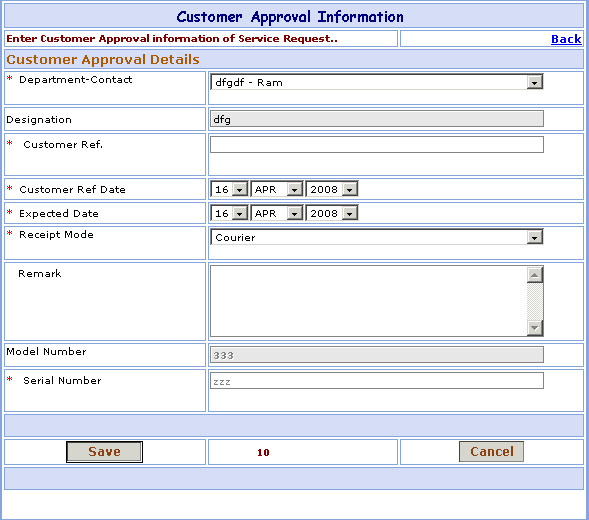
>>Customer Approval Information:
1- Select Department-Contact of Customer.
2- Designation field is automatically selected based on Contact you selected. This is the Designation of the Contact Person.
3- Enter the Customer Ref. Number.
4- Select Customer Ref & Expected Date (DD, MM, YYYY).
5- Select Receipt Mode of Customer Approval.
6- Enter the Remark.
7- Model & Serial Number is automatically selected based on Customer you selected.
Field marked with * are compulsory.
>>Want to save Customer Approval Information?
Follow the steps given below:
2- Click on Save button to save Customer Approval Information.
3- Click on Cancel button to cancel the
Customer Approval Information and clear all the fields to enter New
Customer
Approval Information.
4- Click on Back link, go to the Service Request Search Screen.